Tuesday, April 30, 2013

Cross Linking With Two Patch Cables

In networks, the supremacy of coax cable is a thing of the past. Nowadays, Ethernet connections are made using UTP cables. The BNC plug has yielded to the 8-way RJ45 plug. Previously, coax cables were daisy-chained from computer to computer and terminated at the two ends using 50-_ resistors, but modern networks use central ‘socket boxes’ (switches and/or hubs) to interconnect everything. The connections between the hubs and the computers are made using patch cables having the same sequence of leads in the RJ45 connectors at each end. For making a direct connection between two computers without using a hub or switch, a ‘crossover cable’ is used.

Cross-Linking With Two Patch Cables
Cross-Linking With Two Patch CablesSuch a cable has the leads cross-linked in order to allow the two computers to directly communicate with each other. If there are problems with the network, it can be handy to be able to directly interconnect twocomputers, or directly connect a computer to a cable or ADSL modem without using a hub or switch. A long crossover cable is not always available, and shoving around computers is not an attractive alternative. Consequently, we can use a dual RJ45 wall outlet box to construct an adapter, which can be used to interconnect the two patch cables coming from the equipment in question. This outlet box must be wired to create a cross-linked connection. This is done by making the following internal connections:
  • 1 → 3
  • 2 → 6
  • 3 → 1
  • 4 → 4
  • 5 → 5
  • 6 → 2
  • 7 → 7
  • 8 → 8
Continue Read...

New Dark Activated Terrace Lamp

This device allows one or more lamps to illuminate at sunset and turn off at dawn.Q1 and Q2 form a trigger device for the SCR, providing short pulses at 100Hz frequency. Pulse duration is set by R2 and C1.When the light hits R1, the photo resistor assumes a very low resistance value, almost shorting C1 and preventing circuit operation. When R1 is in the dark, its resistance value becomes very high thus enabling circuit operation.

 Circuit Diagram:
Dark Activated 220 volt AC Lamp Circuit Diagram
 

Parts:


R1 = LDR
R2 = 100K
R3 = 200K
R4 = 470R
R5 = 12KR6 = 1KR7 = 470R
C1 = 10nF-63V
D1 = TIC106D
D2 = 1N4007D3 = 1N4007D4 = 1N4007
D5 = 1N4007
Q1 = BD327
Q2 = BD337
SK1 = Female Mains Socket
 
Notes:

  • R3 allows fine setting of operating threshold and R2 value can be raised to 150K maximum.
  • Several lamps wired in parallel can be connected to the circuit, provided total power dissipation of the load does not exceed about 300 - 500W.
  • PL1 can be omitted and the input mains supply wires connected in parallel to any switch controlling lamps. In this case, if the switch is left open, the circuit will be able to drive the lamps; if the switch is closed, the lamps will illuminate and the circuit will be by-passed.
  • Warning! The circuit is connected to 230Vac mains, and then some parts in the circuit board are subjected to lethal potential! Avoid touching the circuit when plugged and enclose it in a plastic box.
Continue Read...

Sunday, April 21, 2013

Stream powers Soldering Iron

The article can guide you on how a soldering iron is made on your own. Moreover, itll not value you an excessive amount of. scan on to grasp a lot of.


The soldering iron could be a battery operated one. A relay is added in order that the battery is turned off once the adaptor is plugged to a socket. A soldering iron is needed to solder the battery holder, switches and also the wires. If a soldering iron isnt offered, the wires is twisted along and lined using insulation tape. however this could not be the simplest approach.

The hardware needed for this project is listed below:
Soldering iron tip
6V battery holder
A Switch
Wooden box
E-10 lamp base
Soldering iron
Solder

Firstly, the look ought to be created. Since the iron will hande solely a current of regarding one.7 amps, parts that take plenty of current shouldnt be used. All the parts are mounted in an exceedingly wood box. This makes it moveable and simple to use. In case this must be reworked into a plug in iron, all that must be done is to switch the battery pack with a six volt DC wall wart.


Thats it. The soldering iron is currently able to be used. The circuit is changed to suit any specific necessities.
Continue Read...

stream powers low cost Macro Lens

For all photography and video enthusiasts, a macro lens is quite simply a basic necessity. A macro lens is incredibly helpful to produce detailed pictures of tiny objects or options. despite the fact that nearly each photographer or video recorder wants one among these, theyre quite expensive and hence not everybody will afford it.


Nevertheless, theres the simplest way to create yourself a macro lens. Everything may be achieved by using any lens, 2 plastic bottles, super glue, and duct tape. A photography or video device to that the lens has got to be connected is additionally needed.

1st of all, the neck of a bottle is cut employing a hot knife. Another piece of plastic thats the same as the form of the bottle’s neck is cut out from a special bottle. This plastic section is placed at the lowest. This forms the bottom on that the lens can ought to be placed.


The lens are held near the bottle neck using super glue. once holes are created at applicable positions at each ends of the device, its currently able to be connected to any camera. It may be connected permanently using super glue, or quickly with some duct tape.

The lens device are placed directly over the quality lens, permitting the camera to require a definite photograph of tiny options using the first programming.
Continue Read...

Saturday, April 13, 2013

Power Indicator for the Water Softener

This power indicator circuit is intended to be used as an extension for the water softener. It might be easier to just place a LED but it is better to make a rectifier that detects the presence of the 15 kHz signal generated by the 555 IC.

Water Softener Power Indicator Schematic

water softener power indicator schematic
The rectifier is connected at the water softener system with C4 capacitor. D1 and D2 diodes are used to obtain a DC voltage that is filtered by C5 capacitor. This voltage turns ON the FET that lights up the LED. When there is no signal from the oscillator the LED will not glow. D1 and D2 = 1N4148.
NE555 datasheet
Continue Read...

Transistor As a timer circuit

Basically on all timer or timer circuit utilizing most of the basic characteristics of the capacitor.

Transistor As a timer circuit

 The basic characteristic is the process of filling and discharge that occurs in the capacitor. The length of time charging and release depends on the value of the capacitor.


If we observe the above circuit, the light will immediately switch SW1 turns on when we plug it into potensio VR1, this is because the current flowing from VR1 to trigger the transistor base should fill the first capacitor C1. Semakian large capacitance value of C1 then the longer the time required by the transistor to turn on the lights. Then if we connect it to the Ground SW1 then light would soon die and the capacitor will immediately clear the cargo. So can we draw the conclusion that the transistor can be used as a timer circuit using capacitor charging and discharging properties.
Continue Read...

Introduction to MatLab Circuit Analysis

Introduction MatLab can be a useful tool in many applications. We will learn how to analyze a simple electrical circuit, set the problem up as N equations in N unknowns, and transform the equations into a matrix formulation that MatLab can solve. Introduction to MatLab: Circuit Analysis 3 Topics Topics Electrical Devices. Electrical Devices. Kirchhoff’s Laws. Kirchhoff’s Laws. Analyzing a Resistor Network. Analyzing a Resistor Network. Inverting Matrices. Inverting Matrices. A MatLab Solution. A MatLab Solution… Voltage and Current Voltage -the force that pushes electrical Voltage -the force that pushes electrical current around a circuit. (Sometimes current around a circuit. (Sometimes called “potential” as in potential energy.) called “potential” as in potential energy.) Current -the flow of electrical charge Current -the flow of electrical charge through a conductor.

Click here to download Introduction to MatLab Circuit Analysis
Continue Read...

Clipping Indicator For Audio Amplifiers

A clipping indicator is a useful accent on any audio amplifier. It indicates when the amplifier has reached its restrict and is clipping the peaks of the audio sign. In observe, a great deal of clipping can happen prior to which you might hear it. So why is it necessary to underneathstand when an amplifier is clipping if that you couldt no longerice it? The solution is that clipping \"squares up\" the waveform and sq. waves incorporate lots of higher-frequency harmonics which will easily harm the tweeters in loudspeaker techniques. This circuit is a real clipping indicator as adversarial to the extent warning signs which might be recurrently utilized in preamplifier levels.

The problem with stage indications is that an amplifiers maximum output power is not regular. Thats since the amplifiers provide rails aren't regulated and so the utmost power available at any given fast varies, depending on the applied sign. The circuit is rather simple and is in accordance with two BD140 PNP transistors and zener diode ZD1. During customary operation, Q1 is fliped on by way of ZD1 and R1. As a consequence, Q2 is held off (since its base is pulled high) and so LED1 can additionally be off. However, if the output sign therefore upward pushs to within 4.7V of the sure supply rail, Q1 turns off because it no longer has any ahead bias on its base.

Circuit diagram:
Clipping Indicator Circuit Diagram

As a end result Q2s base is now pulled low by way of R2 and so Q2 turns on and light-weights LED1. (Note: the 0.6V drop across Q1s base/emitter is omitted right here as a end result of ZD1 conducts ahead of its rated voltage as a consequence of the very low current involved). Why select four.7V beneath the energy rail as the turn-on point? The reason is that, because of the drive limitations and the nature of emitter followers, they can be anticipated to have as a minimum 4V across them when they saturate (ie, clip). ZD1 can additionally be elevated to a 5V or 6.2V type if the circuit is for use with a monster amplifier.

The worth of R3 should be customized in retaining with the amplifiers supply rail, so that LED1 operates with the precise brightness. To do this, first measure the amplifiers positive provide voltage, then use Ohms Law (R = V/I) to calculate the worth of R3 for a current of about 20mA. As it stands, this circuit can most effective be used to watch the certain-going half-cycles of the audio waveform. If you need to observe the poor half-cycles as smartly, you could have to build a 2d circuit with the next changes: (1) reverse both LED1 and ZD1; and (2) use BD139 (NPN) transistors for Q1 & Q2. Note that, in each instances, you wish to use the earth within the amplifier, because the speaker poor will not be earth (such as in a bridged output).


Author: Philip Chugg - Copyright: Silicon Chip Electronics Magazine
Continue Read...

Friday, April 12, 2013

Automatic Bicycle Light

T his  automatic  bicycle  light  makes cycling in the dark much  easier (although you still need  to pedal of course). The circuit  takes  the  ambient  light  level  into account and only turns on  the light when it becomes dark.  The light is turned off when no  cycling has taken place for over  a minute or if it becomes light  again. The biggest advantage of  this circuit is that it has no manual controls. This way you can  never ‘forget’ to turn the light  on or off. This makes it ideal for  children and those of a forgetful  disposition.

Bicycle Light Image :
Bicycle Image Proj
To detect when the bicycle is  used (in other words, when the  wheels turn), the circuit uses a  reed switch (S1), mounted on  the frame close to the wheel.  A small magnet is fixed to the  spokes (similar to that used with  most  bicycle  speedometers),  which  closes  the  reed  switch  once for every revolution of the  wheel. Whilst the wheel turns,  pulses are fed to the base of T1  via C1. This charges a small electrolytic capacitor (C2). When it is  dark enough and the LDR there-fore has a high resistance, T2  starts conducting and the lamp  is turned on. With every revolution of the wheel C2 is charged  up again. The charge in C2 ensures that T2  keeps conducting for about a minute after  the wheel stops turning. Almost any type of  light can be connected to the output of the  circuit.

Circuit diagram :
Automatic Bicycle-Light-Circuit-Diagram
Automatic Bicycle Light Circuit Diagram
Part List :
Resistors
R1 = 1MΩ (SMD 0805)
R2,R4 = 100kΩ (SMD 0805)
R3,R6 = 1kΩ (SMD 0805)
R5 = LDR e.g. FW150 Conrad Electronics # 183547
Capacitors
C1 = 1µF 16V (SMD 0805)
C2 = 10µF 16V (SMD chip type)
C3 = 100nF (SMD 0805)
Semiconductors
T1 = BC807 (SMD SOT23)
T2 = STS6NF20V (SMD SO8)
Miscellaneous
S1 = reed switch (not on board) +
2-way right angle pinheader
BT1 = 3–12V (see text)

With a supply voltage of 3V the quiescent  current when the reed switch is open is just  0.14 μA. When the magnet happens to be in  a position such that S1 is closed,  the current is 3 μA. In either case  there is no problem using batteries to supply the circuit. The  supply voltage can be anywhere  from 3 to 12 V, depending on the  type of lamp that is connected. Since it is likely that the circuit  will be mounted inside a bicycle light it is important to keep  an eye on its dimensions. The  board has therefore been kept  very compact and use has been made of SMD components. Most  of them come in an 0805 pack-age.  C2 comes in a so called  chip version. The board is single sided with the top also acting as the solder side.
PCB
The print outline for the LDR (R5)  isn’t exactly the same as that of  the  outline  of  the  LDR  mentioned  in  the  component  list.  The outline is more a general one  because there is quite a variety  of different LDR packages on the  market. It is therefore possible  to use another type of LDR, if for  example the light threshold isn’t  quite right. The LDR may also be  mounted on the other side of the  board, but that depends on how  the board is mounted inside the  light. For the MOSFET there are also many alternatives available, such as the FDS6064N3 made  by   Fairchild ,  the  SI4864 DY  made by  Vishay Siliconix , the IR F74 0 4 made by IR F or the NTMS 4N01R 2G  made by ONSEMI. The reed switch also  comes in many different shapes and sizes; some of them are even waterproof and come with the wires already attached.

For the supply connection and  the connection to the lamp you  can either use PCB pins or solder the wires directly onto the  board. The soldered ends of the  pins can be shortened slightly so that they  don’t stick out from the bottom of the board.  This reduces the chance of shorts with any metal parts of the light. Do take care when you use a dynamo  to  power the circuit the alternating voltage must first be rectified! The same applies to  hub dynamos, which often also output an  alternating voltage.

Please Note. Bicycle lighting is subject to legal restrictions, traffic laws and, additionally in  some countries, type approval.
Download : 090102-1 PCB layout (.pdf), from www.elektor.com
Author : Ludwig Libertin (Austria) – Copyright : Elektor
Continue Read...

LED Volt Meter Circuit

Here is a Simple LED Volt meter to Monitor the charge level in Lead Acid Battery or Tubular battery. The terminal voltage of the battery is indicated through a four stage LED indicators. The nominal terminal voltage of a Lead Acid battery is thirteen.8 volts and that of a Tubular battery is 14.8 volts when totally costd. The LED voltmeter uses four Zener diodes to light the LEDs at the exact breakdown voltage of the Zener diodes. Usually the Zener diode requires 1.6 volts in excess than its prescribed worth to be triumphant in the breakdown threshold degree. When the battery clings 13.6 volts or more, all the Zener breakdown and all LEDs illuminate. When the battery is discharged below 10.6 volts, the entire LEDs stay darkish. So depending on the terminal voltage of the battery, LEDs remove darkness from one after the other or flips off.

Circuit diagram:
\"LED-Volt-Meter-circuit-diagram12\" 
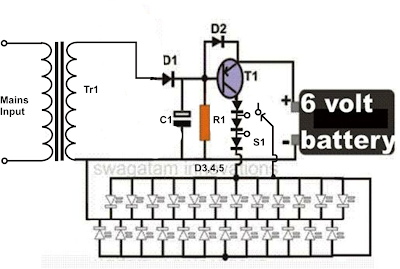
LED Volt Meter Circuit Diagram
 
Continue Read...

Panasonic 3D FULL HDTV Technology


The pitch to Visual authenticity : Reproducing Depth

Panasonic 3D FULL HDTV Technology

With Panasonics VIERA 3D HDTVs, reproducing flawless natural images was the goal. Full HD 3D technologies send rightful-to-life images and do both spatial fidelity and minimized crosstalk in favor of realistic fact.

•Blurless 3D Imaging - earliest Panasonic technologies bear greatly cut-rate crosstalk. This results fashionable a highly realistic 3D experience with the purpose of allows you to dip physically in the image.

•Signal Image Rendering in 3D - Motion image performance has been auxiliary enhanced by optimizing the workstation, driver and panel. Smooth, lucid images are achieved even with 3D images.

•Reproducing Image Depth - VIERAs renowned black idiom is powerful with 3D images equally well. Deep, rich black rendering brings obtainable the natural beauty of both image.

New Crosstalk Reduction knowledge

By accurately detecting the in turn in place of all the proper-eye and absent-eye 3D images, Panasonics 3D HDTVs lessen the fold up image question. This results trendy make, comfortable 3D viewing by dipping the crosstalk.


3D 24p Cinema Smoother

VIERA incorporates skill to analyzes picture in a row in both the preceding and succeeding frames, and creates a precise supplementary frame involving them. This suppresses the jerky effect seen in the field of movies, so playback is smooth and natural-looking. The distinctive tonal qualities and ambiance of the show are preserved, and you get pleasure from exceedingly convincing 3D images. 
Frame Sequential knowledge

The technology in which the missing-eye and acceptable-eye 3D images are sent to the viewer is the solution to 3D image quality. in support of this, gorged HD 3D uses something called the Frame Sequential expertise. chief, the plasma flaunt panel, which has a quantity of inherent advantages for emotive picture pledge, was added later to allow images in favor of apiece of the not here and right eyes to take place alternately reproduced on the rate of 60 frames apiece go along with (fps), making a figure up of 120 fps for both eyes. Viewers watch the images through anticyclone-precision 3D Eyewear*, which amenable and close the absent and right shutters here harmonization with the alternating images. when a effect, a separate high quality image is sent to every eye. This addresses the image quality problems and blurring with the purpose of were nothing special to earlier 3D systems, and creates sour, brittle 3D images.

Plasma 3D Technology

Panasonic 3D FULL HDTV Technology


•Smallest serenity - Reformulating the phosphor equipment has minimized afterglow and increased gleaming efficiency. This reduces crosstalk blare and displays translucent, detailed 3D images.

•Extra Light-Emitting Process - New VIERA optical equipment reduces crosstalk indoors dark areas. conservative light production, which goes from dark-to-light, was distorted to a light-to-dark sequence. This turns highest giving out warm feeling into lowest emission afterglow, and dramatically reduces the feel-good factor duration. besides, by speeding up the timing of both light giving out and expanding the interval until the subsequently frames emission, we greatly concentrated the interference to the absent and sincere frames, which causes crosstalk, and reduced din. 

Continue Read...

RF Amplifier IC

RF amplifier IC is a type of electronic amplifier used to convert low-power radio frequency signal into a larger signal strength is important, usually for driving a transmitting antenna. This is usually optimized for high-efficiency, high output power (P1dB) of compression, loss of income on the input and output, better benefits, and optimal heat dissipation.


RF Amplifier IC
RF Amplifier IC
To make our amplifiers can also use transistors or IC OP Amp. In the op amp is actually a transistor that is in the form of a series so its easier to use.

Suppose that is used in the amplifier IC Op Amp 741 is a monolithic high performance electronic components that use Fairchild epitacial process. IC Op Amp 741 is an IC in which packed a differential circuit. The data sheet of IC Op Amp 741.
Continue Read...

11 W Stereo or 22 W Mono Power Amp

Integrated AF power amps have seen great improvements in recent years offering improved power and easier use. The TDA1519C from Philips contains two power amplifiers providing 11 W per channel stereo or 22 W mono when the two channels are connected in a bridge configuration. The special in-line SIL9P package outline allows the chip to be conveniently bolted to a suitable heatsink. The TDA1519CSP is the SMD version, in this case the heat sink is mounted over, and in contact with, the top surface of the chip.

11W Stereo Amplifier Circuit Diagram
11W Stereo Power Amp Circuit Diagram01
The operating voltage of this device is from +6V to +17.5V. The two channels of the amplifier are different in that one channel, between pins 1 and 4, is a non-inverting amplifier, while the other between pins 9 and 6 is an inverting amplifier. It is therefore necessary in stereo operation, to wire the speakers so that one of them has its polarity reversed. Each amplifier has an input impedance of 60kΩ and a voltage gain of 40dB, i.e. 100 times. When both amplifier are used in a bridge configuration, the inputs are in parallel so that the input impedance will be 30kΩ.

22W Stereo Amplifier Circuit Diagram
A combined mute/standby function is provided on pin 8. In its simplest form this can be connected to the positive rail via a switch. When the switch is open the amplifier will be in standby mode and current consumption is less than 100µA. When the switch is closed, the amplifier will be operational. A circuit is also shown that uses the mute input to prevent the annoying switch-on plop heard when power amps are first switched on This is caused by the rush of current to charge capacitors C1 and C2.

Mute/Standby Switch Circuit Diagram
Mute Standby Switch Circuit Diagram

The circuit shown generates a ramp voltage, which is applied to pin 8. At switch on, as the voltage rises from 3.3 V to 6.4 V, the amplifier will switch out of standby mode and into mute mode allowing C1 and C2 to charge. Only when the ramp voltage on pin 8 reaches 8.5V will the amplifier switch into active mode. Protection built into the TDA1519C would seem to make it almost foolproof. The two outputs can be shorted to either of the supply rails and to each other. A thermal shutdown will prevent overloading and the power supply input is protected against accidental reversal of the supply leads up to 6V.

Source: http://www.ecircuitslab.com/2011/07/11-w-stereo-or-22-w-mono-power-amp.html
Continue Read...

Dark Sensitive Power Switch Circuit Diagram Using LDR


Description

Circuit showing a Dark Sensitive Power Switch .Here we have used a ldr and a ordinary transistor for making this circuit
.Connect any 230 volt equipment at the load .You need a 9 volt power supply
Components Required

         Resistor

                     10 k , 680 R

          Transistor

                        BC 548

          Diode

                   IN 4007

         Relay

         LDR
Continue Read...

8 Channel LPT Relay Circuit


This is a simple design circuit and convenient way to interface 8 relays. This circuit is control using PC. This is the figure of the circuit.


This circuit is using Power Battery Terminal (PBT) for easy relay output and aux power connection. The LED on each channel indicates relay status. Berg pins for connecting power and trigger voltage.
Continue Read...

5 to 15V Regulated Power Supply Rise

Regulated Power Supply
This project is an ordinary DC regulated power supply that may be a variable DC voltage range from 5V to 15V. It can provide present up to  400mA to power the various circuits in your digital projects. The voltage output is different with the aid of the usage of the potentiometer V.R1. In this circuit, the enter line energy provide is designed for 240V.A.C. If 110VAC enter is used, alter the rankings of the varistor to 150VAC & the transformer ratio to 110V/12V. 

Fuse F1 is used as a protection in case theres any short circuit in the circuit. Varistor V1 is hooked up in parallel to the enter of the road voltage to clamp the surge voltage from the road to a cheap level that helps to offer safety to the transformer & other circuitry. One time the voltage degree surge to a excessive level past the flexibility of the varistor to absorb it, fuse F1 or varistor V1 or both will burn. If this circuit failed after a duration of operation, check that the fuse & the varistor are nonetheless in good condition or else exchange them.

Diodes D1, D2, D3 and D4 are used to rectify the 12V.A.C voltage to DC voltage. Electrolytic capacitor E1 is used as a smoothing capacitor to reduce the ripple of the DC voltage. The DC voltage is fed in to the enter of 7805 regulator the place the output DC voltage is got. Changing the value of VR1 will alter the output of the DC voltage. Capacitor C1 is used to filter excessive frequency section from the facility supply.


Continue Read...

Thursday, April 11, 2013

On Demand WC Fan Using 555


In most WCs with an extractor the fan is hooked up to the lighting circuit and that is swaped on and off either in sympathy with the light or with a brief prolong. Since rest rooms are every so often used for laundry the fingers or simply for a fast seem within the reflect, it is no lengthyer at all times necessary to alter the air within the smallest room in the house. The following circuit robotically determines whether there truly is any want to run the fan and reacts appropriately. No odour sensor is needed: we just appoint a small contact that observes when and for a way lengthy the bathroom seat lid is lifted.

If the seat lid is left up for no much less than some presettable minimum time t1, the fan is set working for another presettable time t2. In the instance shown the contact is made using a small magnet on the lid and a reed change established on the cistern. The leisure is straightforward: IC2, the acquainted 555, forms a timer whose period can also be adjusted up to roughly 10 to 12 minutes using P2. This resolves the fan running time. There are three CMOS NAND gates (type 4093) between the reed switch and the timer enter which generate the desired set off signal. When the lid is within the ‘up’ place the reed swap is closed.

\"http://4.bp.blogspot.com/-hJuHHa6khu0/UIum3PsoQSI/AAAAAAAAJmY/EYdHAQTTsjo/s400/Voltage+Inverter-Circuit+diagram.PNG\"Capacitor C1 costs via P1 unless it reaches the level the place the output of IC1a switches from good judgment 1 to logic 0. The output of IC1b then goes to logic 1. The fringe of the zero-1 transition, handed during the RC community fashioned with the aid of C2 and R2, leads to the output of IC1c going to common sense zero for a 2d. This is taken to the set off enter on pin 2 of timer IC2, which in turn changees on the relay which lead tos the fan to run for the time frame decided by using P2. The circuit is powered from a small transformer with a secondary winding turning in between approximately eight V and 10 V. Do no longer omit to incorporate an acceptable fuse on the main facet.

The circuit round IC1b and IC1c ensure thats that the fan does no lengthyer run continuously if the bathroom seat lid is left up for a protracted length. The time constant of P1 and C1 is set so that the fan does no lengthyer run as a result of lavatorial transactions of a extra minor nature, the place the lid is opened and then closed quickly afterwards, before C1 has a possibility to cost sufficiently to trigger the circuit.


Circuit Source: DIY Electronics Projects
Continue Read...

Infrared IR Proximity Distance Sensor Circuit


The photodiode can be used to detect IR reflected from the object. However, IR produced by the ambient conditions also detected by the photodiode. This IR noise must be filtered to prevent false detections. Usually, the LED’s IR signal is modulated with a convenient frequency and then using that modulation to detect only IR to filter the IR noise. So, the photodiode will detect only IR reflected from the object. This method can be simplified by using the IR proximity sensor that has simple receiver and transmitter sections. This is the figure of the circuit;


The transmitter of this circuit consists of a 940nm IR LED (IR11-21C). To turn ON and OFF the IR LED, the a 10kHz oscillator frequency is used. we can control the detection and the level of transmitted power by varying the LED current. The transmit pulses of this transmitter have a small duty cycle (typically 10%), to save power.

The Op amp is biased at 2.5V because there no input IR signal present. The op amp output varies around 2.5V with a dynamic range of 5V because of a 10kHz IR signal incident. The output drives a simple diode detector. A DC signal proportional to its amplitude can be provided by a simple diode detector. Simple diode detector also rectifies the 10kHz signal. The output signal is an analog signal that is proportional to the distance of the object from the IR transmitter. We can fed the output signal to an ADC for further processing or use it directly. 

[Circuit source: MAXIM Application Note]

Continue Read...

Mosfet Battery Charger

Battery Charger series with the MOSFETs are designed to charge batteries from an AC current source charging current with a maximum capacity of 1A, and can be modified in order to provide a higher flow by replacing the value of Q1, R1, D1-D5, and T1 with a greater ability high on "battery charger circuit with mosfet" this. The series charger is working at the point of maximum load line of the ability of Q1, so that Q1 needs to get serious attention to cool it and make re-assembly croscek this battery charger before use.
Mosfet Battery Charger
NiCad batteries have the capacity specifications in units of mAh (Mili Ampere Hour), which is defined as "C". The value of this interpretation of capacity C that can be saved by tesebut NiCad battery. To charge the NiCad battery in a normal (not Fast Charge) used in the formulation of charging current 0.1 C NiCad batteries are in charge for 12 hours. Suppose the battery capacity is 4000mAH then filling current 400mA for 12 hours. The advantage of charging the battery by 0.1 C this formula is to create long-lasting battery is not easily damaged or otherwise not charge the battery too quickly run out.

Output current from the battery charger circuit with mosfet is controlled by the sum of the zener reference diode and the base-emitter connection of PNP transistors. PNP transistor provides negative feedback to the gate MOSFETs. As seen in the scheme. Flow output is determined by the value of R1 is determined by:
R1 = 3.2Volts/Iout
Power dissipation of R1 will be the same:
PR1 = 3.2Volts Iout *
R1 resource capacity and heatsink Q1 adjusted charging current.
Continue Read...

Amplified Ear Circuit

Useful to listen in faint sounds, 1.5V Battery operation
This circuit, connected to 32 Ohm impedance mini-earphones, can detect very remote sounds. Useful for theatre, cinema and lecture goers: every word will be clearly heard. You can also listen to your television set at a very low volume, avoiding to bother relatives and neighbors. Even if you have a faultless hearing, you may discover unexpected sounds using this device: a remote bird twittering will seem very close to you.

Circuit Diagram:
Amplified_Ear Cicuit 
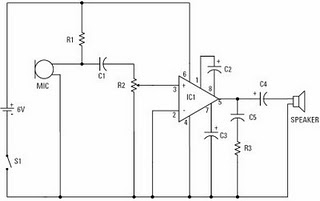
Amplified Ear Circuit Diagram
        
Parts :
P1 = 22K
R1 = 10K
R2 = 1M
R3 = 4K7
R4 = 100K
R5 = 3K9
R6 = 1K5
R7 = 100K
R8 = 100R
R9 = 10K
C1 = 100nF 63V
C2 = 100nF 63V
C3 = 1µF 63V
C4 = 10µF 25V
C5 = 470µF 25V
C6 = 1µF 63V
D1 = 1N4148
Q1 = BC547
Q2 = BC547
Q3 = BC547
Q4 = BC337
J1 = Stereo 3mm. Jack socket
B1 = 1.5V Battery (AA or AAA cell etc.)
SW1 = SPST Switch (Ganged with P1)
MIC1 = Miniature electret microphone

Circuit Operation :

The heart of the circuit is a constant-volume control amplifier. All the signals picked-up by the microphone are amplified at a constant level of about 1 Volt peak to peak. In this manner very low amplitude audio signals are highly amplified and high amplitude ones are limited. This operation is accomplished by Q3, modifying the bias of Q1 (hence its AC gain) by means of R2.
A noteworthy feature of this circuit is 1.5V battery operation. Typical current drawing: 7.5mA.

Notes:
  • Due to the constant-volume control, some users may consider P1 volume control unnecessary. In most cases it can be omitted, connecting C6 to C3. In this case use a SPST slider or toggle switch as SW1.
  • Please note the stereo output Jack socket (J1) connections: only the two inner connections are used, leaving open the external one. In this way the two earpieces are wired in series, allowing mono operation and optimum load impedance to Q4 (64 Ohm).
  • Using suitable miniature components, this circuit can be enclosed in a very small box, provided by a clip and hanged on ones clothes or slipped into a pocket.
  • Gary Pechon from Canada reported that the Amplified Ear is so sensitive that he can hear a whisper 7 meters across the room.
  • He hooked a small relay coil to the input and was able to locate power lines in his wall. He was also able to hear the neighbors stereo perfectly: he could pick up the signals sent to the speaker voice coil through a plaster wall.
  • Gary suggests that this circuit could make also a good electronic stethoscope.


Source by : Streampowers
Continue Read...

Simple Tan Timer

Six timing positions suited to different skin types, Timing affected by sunlight intensity

This timer was designed for people wanting to get tanned but at the same time wishing to avoid an excessive exposure to sunlight. A Rotary Switch sets the timer according to six classified Photo-types (see table). A Photo resistor extends the preset time value according to sunlight brightness (see table). When preset time ends, the beeper emits an intermittent signal and, to stop it, a complete switch-off of the circuit via SW2 is necessary.

Circuit diagram:
A Simple Tan Timer Circuit Diagram
Parts:

R1 = 47K - 1/4W Resistor
R2 = 1M - 1/4W Resistor
R3 = 120K - 1/4W Resistors
R4 = Photo resistor (any type)
R5 = 120K - 1/4W Resistors
C1 = 10µF - 25V Electrolytic Capacitors
C2 = 220nF - 63V Polyester Capacitor
C3 = 10µF - 25V Electrolytic Capacitors
D1 = 1N4148 - 75V 150mA Diodes
D2 = 1N4148 - 75V 150mA Diodes
Q1 = BC337 - 45V 800mA NPN Transistor
B1 = 3V Battery (two 1.5V AA or AAA cells in series)
IC1 = 4060 - 14 stage ripple counter and oscillator IC
IC2 = 4017 - Decade counter with 10 decoded outputs IC
SW1 = 2 poles 6 ways Rotary Switch (see notes)
SW2 = SPST Slider Switch
BZ1 = Piezo sounder (incorporating 3KHz oscillator)

Photo-type
Features
Exposure time
I & children
Light-eyed, red-haired, light complexion, freckly
20 to 33 minutes
II
Light-eyed, fair-haired, light complexion
28 to 47 minutes
III
Light or brown-eyed, fair or brown-haired, light or slightly dark complexion
40 to 67 minutes
IV
Dark-eyed, brown-haired, dark complexion
52 to 87 minutes
V
Dark-eyed, dark-haired, olive complexion
88 to 147 minutes
VI
The darkest of all
136 to 227 minutes
Note that pregnant women belong to Photo-type I

Notes:
  • Needing only one time set suitable for your own skin type, the rotary switch can be replaced by hard-wired links.
  • A DIP-Switch can be used in place of the rotary type. Please pay attention to use only one switch at a time when the device is off, or the ICs could be damaged.
Source :  http://www.ecircuitslab.com/2011/06/simple-tan-timer-circuit-diagram.html
Continue Read...

2Km Fm Transmitter circuit Diagram


This is a powerful transmitter so first of all I would like to tell you not to use this for illeagl things.You can transmitt signals from 2km.Use a matching antenna for this.


Note

# Dont give power without an antenna
# For L1 make 3 turns of 1mm enamelled copper wire on a 10mm diameter plastic former. On the same core make 2 turns of 1 mm enamelled copper wire close to L3 and that will be L2.
# by using R9 the gain can be controlled
# Inductor L3 can be a VK220J type RFC.
# This circuit operates with 9V to 18V ( Dont pass 24V)


Continue Read...

Long Duration Timer using ATtiny2313

This timer circuit is designed to switch on a 12 V load in a solar-powered installation for a preset period at the press of a button. When the period has expired a latching relay disconnects both the load and the controller circuit from the 12 V supply. The length of the period can be configured by making suitable changes to the microcontroller’s source code.


Software
When button S1 is pressed a voltage appears across relay coil L1, and the relay switches the load on. Since the relay is a latching type, it remains in this state when the but ton is released. There is now a supply to the 78L05 voltage regulator (a low-dropout type such as the LP2950CZ-5.0 may also be used) and the microcontroller is powered up. In the microcontroller the timer program runs until the configured time interval has elapsed. Around 90 % of the way through the time period LED D2 lights as a warning that the load will shortly be switched off, and this time can also of course be configured by changing the software.

When the full time interval has elapsed the microcontroller sets an output (pin 7) high, which triggers the CNY 17-3 optocoupler and in turn drives relay coil L2. The relay returns to its initial state, disconnecting the load as well as the controller (which is also powered via the relay contact) from the 12 V supply.

Long Duration Timer Circuit Diagram

Long Duration Timer

The author used a miniature 16 -by-2 LCD panel type HMC16223SG in his prototype, measuring just 52 mm by 20 mm. It is of course possible to use any standard LCD module that uses an HD44780-compatible controller. Note that P1 is used to adjust the contrast of the LCD: if the display appears blank it is worth checking the contrast set-ting before suspecting a more serious problem! If desired, the LCD can be dispensed with, along with the corresponding parts of the source code.

The upper line of the LCD shows the total time period, in seconds, for which the soft-ware is configured, while the lower line shows the time, in seconds, since the button was pressed.

The screendump shows the LCD settings under BASCOM-AVR. The source code for the program is available for download. Link
Continue Read...

Box Kit Home Theaters

Box Kit Home Theaters | We live in a world where convenience is increasingly growing in demand. For this reason many home theater buyers expect convenience when it comes to the purchase and set up of their home theater systems. It goes without saying that there are all kinds of consumers in the world and even in matters of convenience supply and demand have not emerged to create a one size fits all society. We all want similar things in many ways yet we still want autonomy and selections from which to choose.


Box Kit Home Theaters

The demands of a society that likes the ease of buying prepackaged goods have reached such a point however that packages are common place in everything from prepackaged dinners to prepackaged home theater systems. On one level these types of prepackaged theater systems provide a great deal of convenience to consumers. Among those benefits is the ability to know the cost of the entire system up front. This is actually a small benefit when compared to some of the other benefits that consumers who purchase these systems experience.

Continue Read...

Wednesday, April 10, 2013

Hi Fi 25W Power Amplifier Class A

Hi-Fi 25W Power Amplifier (Class-A) Schematics Circuit
Hi-Fi 25W Power Amplifier (Class-A)
Click to view larger
Continue Read...

Simple Heat Sensor Circuit Diagram

This simple heat sensor circuit could senses heat from various electronics device like computer, amplifier etc. and generate warning alarm. It could senses heat from environment also, but here I mention “electronics device” because it is being using mostly in electronic device to protect them from overheat. 
Simple Heat Sensor Circuit Diagram

Thermistor, 110 Ohms:

Thermistor (110 Ohms)
Fig-2: 110 Ohms Thermistor
As it is a heat sensor circuit, here a thermistor is used as a heat sensor. It is a thermal measurement device and has a variety of usages including temperature sensor/ heat sensor. The thermistor used in this circuit is a NTC (Negative Temperature Coefficient) type thermistor. When temperature increases, its resistance goes decrease. Therefore, NTC thermistor’s resistances are inverse of temperature.

Circuit Description:

You have seen, in this simple circuit diagram of heat sensor, a few number of components is used including a BC548 transistor, a 110 ohms thermistor etc.
  • BC548: BC548 is a TO-92 type NPN transistor, as its alternative you can use 2N2222, BC238, BC548, BC168, BC183 etc. they all have almost same characteristic.
  • 110 Ohms Thermistor: A 110 Ohms thermistor is used to detecting heat. I have told already about it.
  • Buzzer: A buzzer is used with +9V and collector of transistor. When the temperature/ heat exceeds a certain level then it make an alarm.
  • 4.7V Zener diode:  It is used to limit the emitter current of BC548.
  • 9V Battery: A 9V battery is used as a single power source.
  • R1, R2: A 3.3K 1/4w resistor is used as R1 and 100 ohms 1/4w as R2.
  • Switch: Here in this circuit the switch used is a simple SPST switch. You can either use the switch or not, choice is yours. It is not mandatory.

Continue Read...

Simple 500W 12V to 220V Inverter


This is a 500W DC-to-AC inverter circuit diagram which produces an AC output at line frequency and voltage. 12VDC to 220V 50Hz inverter circuit will power 220V or 110V appliances from 12V car battery. The circuit is easy to make and is low cost. Use proper transformer. The output (in watts) is up to you by selecting different power rating transformer and power transistor rating. If you load electronic device which require 120V AC, then use transformer with 120V in output.link
Continue Read...

Valve Sound Converter

‘Valve sound’ is not just an anachronism: there are those who remain ardent lovers of the quality of sound produced by a valve amplifier. However, not everyone is inclined to splash out on an expensive valve output stage or complete amplifier with a comparatively low power output. Also, for all their aesthetic qualities, modern valve amplifiers burn up (in the full sense of the word!) quite a few watts even at normal listening volume, and so are not exactly environmentally harmless. This valve sound converter offers a cunning way out of this dilemma. It is a low cost unit that can be easily slipped into the audio chain at a suitable point and it only consumes a modest amount of energy.
Valve Sound Converter-Circuit diagram
A valve sound converter can be constructed using a common-or-garden small-signal amplifier using a readily-available triode. Compared to using a pentode, this simplifies the circuit and, thanks to its less linear characteristic, offers even more valve sound. For stereo use a double triode is ideal. Because only a low gain is required, a type ECC82 (12AU7) is a better choice than alternatives such as the ECC81 (12AT7) or ECC83 (12AX7). This also makes things easier for home brewers only used to working with semiconductors, since we can avoid any difficulties with high voltages, obscure transformers and the like:the amplifier stage uses an anode voltage of only 60 V, which is generated using a small 24 V transformer and a voltage doubler (D3, D4, C4 and C5).
Since the double triode only draws about 2mA at this voltage, a 1 VA or 2 VA transformer will do the job. To avoid ripple on the power supply and hence the generation of hum in the converter, the anode voltage is regulated using Zener diodes D1 and D2, and T1. The same goes for the heater supply: rather than using AC, here we use a DC supply, regulated by IC1. The 9 V transformer needs to be rated at at least 3 VA. As you will see, the actual amplifier circuit is shown only once. Components C1 to C3, R1 to R4, and P1 need to be duplicated for the second channel.
Valve Sound Converter-w
The inset valve symbol in the circuit diagram and the base pinout diagram show how the anode, cathode and grid of the other half of the double triode (V1.B) are connected. Construction should not present any great difficulties. Pay particular attention to screening and cable routing, and to the placing of the transformers to minimise the hum induced by their magnetic fields. Adjust P1 to set the overall gain to 1 (0 dB). The output impedance of 47 kΩ is relatively high, but should be compatible with the inputs of most power amplifiers and preamplifiers.

For a good valve sound, the operating point of the circuit should be set so that the audio output voltage is in the region of a few hundred millivolts up to around 1.5 V. If the valve sound converter is inserted between a preamplifier and the power amplifier, it should be before the volume control potentiometer as otherwise the sound will change significantly depending on the volume. As an example, no modifications are needed to an existing power amplifier if the converter is inserted between the output of a CD player and the input to the amplifier.


http://www.ecircuitslab.com/2012/04/valve-sound-converter.html
Continue Read...

LCD Module in 4 bit Mode

In many projects use is made of alphanumeric LCDs that are driven internally by Hitachi’s industry-standard HD44780 controller. These displays can be driven either in 4-bit or 8-bit mode. In the first case only the high nibble (D4 to D7) of the display’s data bus is used. The four unused connections still deserve some closer attention. The data lines can be used as either inputs or outputs for the display. It is well known that an unloaded output is fine, but that a floating high-impedance input can cause problems. So what should you do with the four unused data lines when the display is used in 4-bit mode? This question arose when a circuit was submitted to us where D0-D3 where tied directly to GND (the same applies if it was to +5 V) to stop the problem of floating inputs.
The LCD module was driven directly by a microcontroller, which was on a development board for testing various programs and I/O functions. There was a switch present for turning off the enable of the display when it wasn’t being used, but this could be forgotten during some experiments. When the R/Wline of the display is permanently tied to GND (data only goes from the microcontroller to the display) then the remaining lines can safely be connected to the supply (+ve or GND). In this application however, the R/Wline was also controlled by the microcontroller. When the display is initialised correctly then nothing much should go wrong. The data sheet for the HD44780 is not very clear as to what happens with the low nibble during initialisation.
Circuit diagram :
LCD module_in_4-bit_Mode_Circuit_Diagramw
LCD Module in 4-bit Mode Circuit Diagram
After the power-on reset the display will always be in 8-bit mode. A simple experiment (see the accompanying circuit) reveals that it is safer to use pull-down resistors to GND for the four low data lines. The data lines of the display are configured as outputs in this circuit (R/Wis high) and the ‘enable’ is toggled (which can still happen, even though it is not the intention to communicate with the display). Note that in practice the RS line will also be driven by an I/O pin, and in our circuit the R/W line as well. All data lines become high and it’s not certain if (and if so, for how long) the display can survive with four shorted data lines. The moral of the story is: in 4-bit mode you should always tie D0-D3 via resistors to ground or positive.
Author: L. Lemmens - Copyright: Elektor Electronics
Continue Read...

Switch For Switch Free Power Supplies

Portable radios, CD-players and cassette recorders that can also be operated from mains power often do not have a mains power switch, but instead are switched off on the ‘DC side’. This means that the power supply is permanently connected to the mains network if the mains cable is not unplugged. The situation with equipment requiring a mains adapter is similar. This is not ideal for the environment or for your pocketbook. The following circuit allows power to be switched on manually and switched off automatically, directly at the equipment. Optoelectronic isolation between the mains voltage and the switching stage ensures continued compliance with safety regulations.

Switch For Switch-Free Power Supplies circuit schematic

Switching on:

The circuit consists of the switch-on stage T1 and the hold-on and switch-off stage T2/T3. Both stages drive the power switch, which is implemented using a semiconductor relay (IC1). The voltage from the two button cells (2–3 V) is connected to the LED of the semiconductor relay by pressing push-button switch S1. R1 allows a diode current of around 10mA to flow. At the same time, T1 prevents a ‘charging current’ from flowing into the batteries when the semiconductor relay that switches the mains voltage is energized by T2. Although such a current can only flow while the push-button is pressed, this possibility must be taken into account for safety reasons.

Circuit diagram:

Switch For Switch-Free Power Supplies circuit schematic

When the LED of the semiconductor relay is energized by the battery current, the triac connects the mains voltage to the transformer of the power supply. The DC voltage provided to the load is twice reduced by 0.65 V by diodes D2 and D3. This threshold voltage, smoothed by C1, provides a base current for T3, which drives T2 into conduction. T2 in turn supplies current via R2 to LED D1 and the LED in IC1. R2 must be matched to the DC voltage of the equipment to allow a LED current of 10mA to flow. As long as the push-button is pressed, two LED currents flow, and together they should not amount to more than 20mA in order to avoid destroying the LED in IC1.

Switch For Switch-Free Power Supplies circuit schematic

Switching off:

The voltage drop across D2 and D3 is only present if a current drawn by the connected equipment flows from the output of the circuit. If this current is interrupted by switching off the equipment, T3 and T2 will be cut off. The semiconductor relay will then open, and the mains voltage will be switched off. This switch-off process is delayed by capacitor C1, so that (for example) you can exchange an audio cassette without causing the recorder to be disconnected from the mains. For the semiconductor relay, you should select a type having a zero-crossing switch. This means that the triac will only switch on at the zero point of the mains voltage, regardless of when the push-button is pressed.

Almost no current will thus flow at the instant when the triac switches, which prevents inductive switching spikes and associated interference. The S201S01 semiconductor relay used here can switch currents up to 8 A (continuous) or 80 A (single-cycle peak). Figure 2 shows how to connect the circuit between the power supply and the charging capacitor. When laying out the circuit board, ensure that all components carrying mains voltage are separated from each other by at least 3 mm and from the low-voltage area by at least 6 mm. Naturally, the same considerations apply to fitting the circuit board into the equipment to be switched. If there is not sufficient space inside the equipment, the circuit can be fitted between the equipment and the mains adapter as a sort of cable switch.
Continue Read...

Make an Efficient LED Emergency Light Circuit

The article describes a very simple homemade emergency light circuit that can be used during power failures and outdoors where any other source of power might be unavailable. The circuit uses LEDs instead of incandescent lamp, thus making the unit very power efficient and brighter with its light output. Moreover, the circuit employs a very innovative concept especially devised by me which further enhances the economical feature of the unit.

We know that LEDs require a certain fixed forward voltage drop to become illuminated and it is at this rating when the LED is at it’s best, that is voltages which is around its forward voltage drop facilitates the device to operate in the most efficient way.
As this voltage is increased, the LED starts drawing more current, rather dissipating extra current by getting heated up itself and also through the resistor which also gets heated up in the process of limiting the extra current.
If we could maintain a voltage around an LED near to its rated forward voltage, we could use it more efficiently. That’s exactly what I have tried to fix in the circuit.
Since the battery used here is a 6 volt battery, means this source is a bit higher than the forward voltage of the LEDs used here, which amounts to 3.5 volts. The extra 2.5 volts rise can cause considerable dissipation and loss of power through heat generation.
Therefore I employed a few diodes in series with the supply and made sure that initially when the battery is fully charged; three diodes are effectively switched so as to drop the excess 2.5 volts across the white LEDs (because each diode drop 0.6 volts across itself).
 Now as the voltage of the battery drops, the diodes series are reduced to two and subsequently to one making sure only the desired amount of voltage reaches the LED bank.
In this way the proposed emergency lamp circuit is made highly efficient with its current consumption, and it provides backup for a much longer period of time than what it would do with ordinary connections.

Continue Read...

Basic Components for a Home Theater

Many people never bother looking into purchasing a home theater through sheer fear of the decisions that may need to be made in the process. Many among these aren’t even sure of exactly which components are included in a home theater or which ones are needed in order to create an effective and entertaining home theater. For this reason, many people simply do not bother going through the process of looking at their options when it comes to these wonderful systems on the market today much less ever bother actually purchasing one.

Basic Components for a Home Theater
If you are one of the many who has experienced some degree of confusion when it comes to the individual parts and pieces that are included in a home theater system and what they do, hopefully you will gain a better understanding once you’ve finished reading. The first thing to understand is that there are varying degrees when it comes to home theaters. The following components are the makings of a very basic home theater that will provide excellent functionality. They are not however inclusive of every possible piece or part that could make up a home theater system.

Speaker Setup
Speaker Setup
Off to the basics, the first thing you’ll need when creating a home theater for your family to enjoy is a television. It might seem a little too obvious to some but I have yet to find a box kit that includes a television—mainly because the choice of screen is for many the most personal aspect of selecting a home theater. There are essentially three choices in today’s television market: front projector, rear projector, and plasma. There are variations within each of these and the prices fall anywhere from modest to quite costly. This is the component that most home theater owners spend the most time contemplating and it affects the types of components that will be most effective later on in terms of things such as high definition and other choices you can make.

A receiver is another important component. You will probably have a DVD player or recorder of some sort as part of your system; you may have a Tivo and cable box or satellite and will probably have speakers of some sort for your system. The receiver is the box you plug them all into—it receives all of this inputs and correlates it so to speak. This is the ultimate traffic director when it comes to your home theater and I suggest you spend a good portion of your home theater budget making sure that this is a good quality part.

Speakers are where your sound will flow. One of the best things to me about a home theater is the ability to experience surround sound very similar to what I experience in theaters while having the ability to put my feet up or snuggle under blankets (which simply can’t be achieved in a theater). Speakers come in all shapes and sizes and are also quite personal for some consumers while give and take for others. You can purchase these are part of a kit in order to make the selection process easier.

Finally, you have your DVD player or recorder. If high definition is important to you, you now have that option. If your television isn’t HD ready or capable, I’d pass and go for an older (less expensive) model of DVD player until something more up-to-date is called for. These items are a great start for any home theater and you can build, expand, and upgrade over time for an even better system. Enjoy!

PPPPP

599

Related Circuit : Make 5.1 channel amplifier and speaker setup
Continue Read...

Tuesday, April 9, 2013

Trailer Wiring Diagramsjohnson Trailer Salescolfax Wisconsin

Trailer Wiring on Way   7 Pole Rv Travel Trailer Connector Wiring Color Code
Way 7 Pole Rv Travel Trailer Connector Wiring Color Code.


Trailer Wiring on Trailer Wiring Diagrams  Johnson Trailer Sales  Colfax Wisconsin
Trailer Wiring Diagrams Johnson Trailer Sales Colfax Wisconsin.


Trailer Wiring on Trailer Wiring Sop
Trailer Wiring Sop.


Trailer Wiring on Trailer Light Wiring   Typical Trailer Light Wiring Diagram
Trailer Light Wiring Typical Trailer Light Wiring Diagram.


Trailer Wiring on Trailer Wiring
Trailer Wiring.


Trailer Wiring on Troubleshooting Trailer Wiring
Troubleshooting Trailer Wiring.


Trailer Wiring on For A Trailer Plug And Tow Bar Socket Wiring Diagram
For A Trailer Plug And Tow Bar Socket Wiring Diagram.


Trailer Wiring on Http Www Tridenttrailers Com Trailer Wiring Diagram Htm For Britain
Http Www Tridenttrailers Com Trailer Wiring Diagram Htm For Britain.


Trailer Wiring on Trailer Wiring
Trailer Wiring.


Trailer Wiring on Trailer Wiring Diagrams  Johnson Trailer Sales  Colfax Wisconsin
Trailer Wiring Diagrams Johnson Trailer Sales Colfax Wisconsin.


Continue Read...